Wednesday, February 22, 2012

My Favorite Beauty Product for February!!

IMAGE Ageless Total Facial Cleanser

Q: What is it? 
A: Hands down the BEST cleanser for Normal/ Combination Skin.

Q: Why? 
A: It works like a charm for many skin concerns because 
its packed with Glycolic Acid, Citric Acid and Eucalyptus!

Q: Where can I get it?
A: It is a medical grade skincare product but you can buy it at Belleza Med Spa.


Review: I love this product, it leaves my skin feeling smooth, refreshed and glowing. I have combination skin, so this product has helped to keep my break outs to a bare minimum, evened out my skin tone and really gives me a fresh faced feeling without stripping my skin. I have used it for 2 1/2 years and I love it. It is typically sold in medical spas and they usually have trial packs for FREE. Happy Skin All!!
This Cleanser is Amazing!! I love it.

For More info check out IMAGE Skincare.

Wednesday, February 15, 2012

How to use a nail stamp!!

DIY Konad Nail Stamp
*
*
*
The supplies you will need are...
~100% Acetone (Removes polish the easiest and cleans rubber stamp and plate the best.)
~2 colors of nail polish that are contrasting. (A light color and a dark color.)
~A quick drying top coat.
~Konad rubber stamp, design plate and scraper.
~100% real hair fiber brush. (The one used to do the DIY French Tips works great!)


1. Begin with a clean nail OR dry nail polish.
(I  am going to stamp over my new french tips!)


2. Paint the stamping color in a thick line above the design of choice.
3. Make sure your stamp is clean and free of lint and polish. (Rub it with Acetone and a cotton ball.)
4. Using the scraper, scrape the paint across the design. (Do this in one firm motion.)


5. When you are done it should look like this.


6. Next roll the stamp from left to right across the design. (Use one firm motion for best results.)


7. Now line the design up to your nail and in a similar motion press the design in place.
8. Make sure to clean your stamp off after each transfer. (Stamp has to be clean to work.)


9. If all goes well then your stamp will be transferred.
10. If the stamp transferred onto other parts of the nail where it is not wanted, 
just use our brush and Acetone to remove the excess.


11. Repeat steps 1-10 to all the nails as desired.
12. Finish off with a Quick Dry Top Coat and Voila!!

Monday, February 13, 2012

Have Your Own Salon Style French Tips in Any Color!!


DIY Salon Inspired French Tip
*
*
*
You will need the following items...
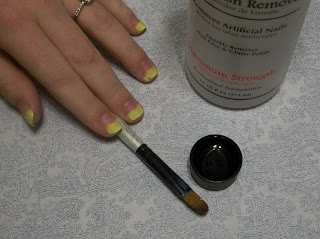
~100% Pure Acetone ( Works best, but regular polish remover will work too.)
~Any Color of Nail Polish (Even Glitter Polish!!)
~100% Natural Bristle Brush ( Roughly size of a fingernail and rounded at the top.)
~Quick Dry Top Coat
  

 1. Paint the tips of all your nails with 2 coats of nail polish. 


2. Poor Acetone into the cap and dip the brush in it.
3. Gradually begin removing polish in a round pattern until desired thickness is achieved.


4. Repeat Steps 1-3 on all nails.
5. For best results allow polish to dry completely before beginning, 
only paint the tips and use 100% Acetone.


Voila, you can now create an easy and professional salon inspired look in minutes... 
And for a fraction of the cost!!


How to Make a Beautiful Beaded Charm

DIY Beaded Charms!
*
*
*
For this fun project you will need the following...
~Wire Cutters (Craft or Floral are best.)
~Round Needle Nose Pliers
~Selection of Beads of your Choice
~Fancy Head Pins


1. Thread your bead onto the fancy head pin.
2. About 2mm above the bead bend your head pin at a 90-120 degree angle.


3. Begin to wrap your head pin around the round nose pliers to form a loop.
 4. After forming a loop, start to wrap the wire around towards to the bead.


 5. The goal is to make the wrapping even, and gradual.
It should fit snugly at the top of the bead.


6. Once you have reached the top of the bead, cut the excess wire off using the wire cutters.


Voila!! You have made a beautiful, one of a kind beaded charm!


Tuesday, February 7, 2012

How to Make Beautiful Crystal Dangle Earrings

DIY Filigree Crystal Earrings!
*
*
*
For this project you will need...
~Wire Cutters (Floral or craft wire cutters are perfect.)
~Rounded Nose Needle Nose Pliers
~2 Head Pins
~Assortment of Crystal Beads
~Fancy Bead Caps
~Spacer Beads
~2 Earring Wires


1. Place your beads, bead caps and spacer beads onto the head pin in a pleasing order.
(Make sure you have enough beads, spacers and bead
caps to repeat this step for the other earring.)


2. Leave approx 5mm of room at the end of the head pin.
3. Bend the head pin at a 90 degree angle as close to the top bead as you can.

 4. Start at the very end of the head pin and wrap in back
towards the base using the shape of the pliers.
( The trick is to make a nice round loop at the top!)


5. Almost Done!! Now open up the end of your earring wire.


6. Connect your Crystal Beaded Head Pin to your earring hook by hooking 
the loop onto the open end of your earring wire.


Voila!! Repeat steps 1-6 and you will have a finished pair of 
Filigree Crystal Earrings that are hand made and one of a kind!!